Boiler Tube Welding: A Practical How-To Guide
A comprehensive, step-by-step guide to boiler tube welding, covering safety, materials, techniques, inspection, and common pitfalls for homeowners and facility managers.

By the end of this guide, you will be able to identify suitable filler materials for boiler tubes, prepare clean joints, execute a properly aligned weld, and verify the seal with pressure testing. You will also learn essential safety practices, code considerations, and common mistakes that reduce weld integrity for long-term reliability.
What boiler tube welding is and when it’s needed
Boiler tube welding is a specialized procedure used to join or repair the round tubes that carry water or steam inside a boiler. It’s performed when tubes develop leaks, experience corrosion, or require replacement after wear or damage. In industrial and residential boiler rooms, maintaining tube integrity is critical to safe operation and efficiency. According to Boiler Hub Team, a well-executed weld improves heat transfer performance and reduces downtime due to leaks. The process demands precise joint preparation, compatible filler material, and strict adherence to safety and inspection standards. When done correctly, boiler tube welding restores structural integrity without compromising system pressure or safety margins. This section lays the groundwork for understanding what professionals check before welding begins.
Safety and codes you must follow
Safety is non-negotiable in boiler work. Ensure the boiler is isolated from its power source, depressurized, and cooled before any welding begins. Personal protective equipment (PPE) should include flame-resistant clothing, a welding helmet with appropriate shade, safety glasses, gloves, and hearing protection. Local codes and manufacturer specifications govern acceptable procedures, filler materials, and testing methods. OSHA and state boiler regulations typically require documented lockout/tagout procedures and validated welding qualifications for anything involving pressure vessel joints. Boiler Hub Analysis, 2026 emphasizes that rigorous preparation and testing correlate with fewer weld failures and safer boiler operation. Always maintain clear access to emergency shutoffs and ventilation to control fumes in confined spaces.
Materials: tubes, filler metals, and consumables
Choosing the right materials is essential for a durable boiler tube weld. Tube material commonly includes carbon steel or stainless variants, depending on the boiler design and operating conditions. Select filler metal that matches or is compatible with the tube material (for example, ER70S-6 for carbon steel or ER316L for stainless steel), and ensure the shielding gas (for GTAW/GMAW) is appropriate for the alloy and thickness. Additional consumables—such as degreaser, brushes, and fit-up clamps—help achieve clean, precise joints. Always verify compatibility with the boiler manufacturer’s specifications and corrosion resistance requirements. This compatibility is a key determinant of long-term reliability in boiler tube welding.
Preparation: cleaning, fit-up, and alignment
Effective joint fit-up begins with removing oil, grease, and scale from tube ends using appropriate cleaners and brushes. Mechanical cleaning is preferred for pressure-containing joints to avoid introducing contaminants. Cut and square the tube ends, then deburr to prevent stress concentrators. Align tubes with fixtures or clamps to maintain straight, concentric joints during welding. Tack weld at multiple points to prevent shifting. Proper fit-up reduces porosity, warping, and misalignment—common culprits behind failed boiler tube welds. According to Boiler Hub Team, meticulous preparation is often the difference between a reliable seal and frequent leaks.
Welding processes suitable for boiler tubes
Boiler tube welding often uses TIG (GTAW) for precision and control on thin sections, especially with stainless or specialized alloys. SMAW (stick) is common for field repairs where portability and simplicity matter, though it offers less control of heat input. GMAW (MIG) can be efficient on thicker sections but requires clean, right-sized joints and shielding gas. For critical boiler tubes, a multi-pass approach with a root pass followed by fill passes provides better penetration and seam integrity. Choose process based on material, thickness, access, and required codes. Always follow manufacturer and code requirements for pressure-containing joints.
Joint design and fit-up specifics
Joint design influences strength and leak resistance. Common configurations for boiler tubes include lap joints, butt joints, and corner joints depending on tube orientation and available space. A tight root gap (often a few thousandths of an inch) and proper chamfer or square ends support even weld penetration. Use alignment fixtures to keep tubes concentric and prevent misfit. Preheating may be necessary for thick sections or certain alloys to minimize thermal stress and cracking. The goal is a consistent, torch-free weld that blends smoothly with the tube surface.
Post-weld inspection and testing methods
Post-weld evaluation confirms the integrity of boiler tube welds. Visual inspection checks surface cracks, undercutting, and porosity. Non-destructive testing (NDT) like dye-penetrant or magnetic particle testing detects surface flaws not visible to the eye. Hydrostatic or pneumatic pressure testing verifies that the joint seals under operating pressure. Any detected defects should be repaired or retested according to codes. Documentation of testing and results supports ongoing boiler reliability and safety.
Troubleshooting common weld defects on tubes
Common defects include porosity from contamination or moisture, lack of fusion at the weld toe, and cracking due to excessive heat input or restraint. Porosity is mitigated by thorough cleaning and proper gas shielding; ensure a dry work environment. Lack of fusion often stems from inadequate heat or poor joint preparation, so check root passes and clean gaps. Cracks indicate thermal stress or material incompatibility and may require preheating, slower travel speed, or alternative filler materials. Roasted tips: monitor heat input, purge with inert gas where appropriate, and verify that the tube material and filler metal are compatible before welding.
Maintenance and leak prevention
Once welded, regular inspection helps catch issues before leaks develop. Schedule periodic visits to verify joint integrity, look for signs of corrosion, and monitor boiler pressure trends. Keep the area clean, ensure proper insulation, and replace worn gaskets around welded regions as needed. Corrosion and thermal cycling remain the primary threats to tube weld longevity, so protective coatings and correct operating temperatures reduce failure risk. Boilermakers should maintain a log of welds, tests, and maintenance actions to support compliance and safety culture.
Best practice: DIY vs hiring a qualified contractor
Boiler tube welding is a high-stakes task. While small, non-pressurized repairs may be feasible for skilled hobbyists with appropriate equipment, most boiler tube welds—especially those affecting pressure boundaries—should be performed by qualified welders with documented code training and supervision. The Boiler Hub team recommends engaging a certified contractor for critical joints and strict adherence to safety regulations. For routine maintenance, technicians with boiler-specific experience can manage inspection, cleaning, and minor repairs, minimizing downtime and risk.
Tools & Materials
- Welding machine (GTAW/TIG preferred for precision)(AC/DC capable with stable current for thin-walled tubes)
- PPE and safety gear(Flame-resistant clothing, welding helmet with appropriate shade, gloves, goggles)
- Filler metal (matching alloy)(ER70S-6 for carbon steel; ER316L for stainless steel; verify compatibility)
- Shielding gas (for GTAW/GMAW)(Argon or argon-rich mixtures as appropriate for the alloy)
- Tube cleaning tools(Degreaser, wire brushes, scrapers; ensure dry surfaces)
- Fit-up clamps and alignment fixtures(Maintain concentric alignment during welding)
- Grinding and deburring tools(Prevent stress risers at tube ends)
- Non-destructive testing (NDT) tools(Magnetic particle or dye penetrant as needed)
- Hydrostatic testing equipment(Used to verify leak-tightness under pressure)
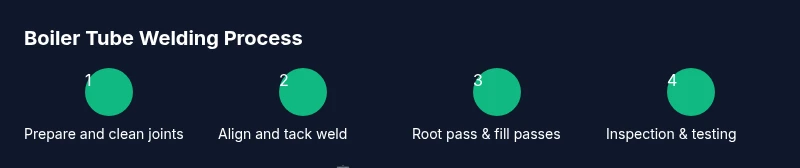
Steps
Estimated time: 3-6 hours
- 1
Isolate and plan
Power down the boiler and depressurize the system. Perform a risk assessment and confirm work permits are in place. Establish a plan for joint access, required materials, and testing methods before starting.
Tip: Document the scope and confirm that all safety valves and energy sources are isolated. - 2
Prepare tools and workspace
Gather all tools, PPE, filler metal, and testing equipment. Set up clamps and fixtures, and ensure the work area is well-ventilated and free of flammable materials.
Tip: Double-check shielding gas supply and ensure gas purity to avoid porosity. - 3
Clean and inspect joints
Thoroughly degrease and mechanically clean the tube ends. Inspect for corrosion, nicks, and burrs. Remove scale and ensure square, true ends for proper fit-up.
Tip: Use a consistent cleaning solvent and a fresh brush to avoid recontamination. - 4
Fit-up and clamp
Align tubes using fixtures to keep concentricity. Dry-fit to verify gaps, then tack weld at multiple points to hold alignment without introducing distortion.
Tip: Keep tack welds small to reduce heat-affected zone effects. - 5
Preheat and set parameters
Preheat if the material or wall thickness requires it, following filler metal recommendations. Set welding parameters to achieve adequate penetration without overheating.
Tip: Avoid rapid changes in heat input; maintain a stable travel speed. - 6
Root pass
Perform the root pass with controlled heat and steady travel to establish a sound base. Check for proper fusion at the root and avoid trapping porosity.
Tip: Pause briefly to verify root integrity before proceeding. - 7
Fill and cap passes
Proceed with successive fills, maintaining uniform bead height and avoiding excessive heat. Clean between passes to prevent contamination.
Tip: Use multi-pass technique when required by wall thickness. - 8
Post-weld cleanup
Remove slag or oxide, visually inspect the bead, and deburr as needed. Prepare for testing by ensuring no loose debris remains.
Tip: Wipe surfaces with a clean cloth before inspection. - 9
Inspection and testing
Conduct visual inspection, and perform non-destructive testing or hydrostatic testing as required by code. Record results and address any defects promptly.
Tip: If defects are found, halt work and reassess joint design and technique.
Questions & Answers
What is boiler tube welding used for?
Boiler tube welding is used to repair or join boiler tubes to maintain pressure integrity and efficient heat transfer. It’s essential for preventing leaks that can cause outages or safety hazards.
Boiler tube welding is done to repair or join tubes to keep the boiler safe and efficient.
Can I perform boiler tube welding myself?
Only if you have formal welding training, the right certifications, and the proper pressure testing setup. Critical boiler tube welds should be done by a qualified welder according to local codes.
Only if you’re trained and certified. For critical welds, hire a qualified welder.
What materials are suitable for boiler tubes?
Common materials include carbon steel and stainless steel alloys. Choose a filler metal that matches the tube material and verify compatibility with operating temperatures and corrosion resistance requirements.
Most boiler tubes use carbon or stainless steel; pick a compatible filler metal.
What testing validates a boiler tube weld?
Visual inspection, non-destructive testing (NDT), and hydrostatic or pneumatic pressure testing are typical validation methods. Follow the project’s code requirements for acceptance criteria.
Inspect visually, use NDT as needed, and pressure test the joint.
What are common defects in boiler tube welds?
Porosity, lack of fusion, and cracks are typical issues. These result from contamination, improper heat, or poor fit-up and require corrective action before the boiler is put back into service.
Common defects are porosity, lack of fusion, and cracks; fix before service.
Is preheating always required for boiler tubes?
Preheating is not always required, but may be necessary for thick sections or certain alloys to reduce thermal stress and cracking. Consult material specifications and code requirements.
Preheating isn’t always needed, but it helps with some materials and thickness.
Watch Video
Key Points
- Prepare joints thoroughly before welding
- Use compatible filler materials and appropriate processes
- Maintain clean joints and precise fit-up to prevent defects
- Inspect welds with visual checks and NDT when required
- Hire qualified professionals for critical boiler tube welds