How to Boiler Room Blue Prince: A Step-by-Step Guide
A comprehensive, step-by-step guide to understanding and maintaining a boiler room nicknamed the 'blue prince.' Learn safety practices, diagnostics, maintenance routines, and when to call a pro. This Boiler Hub guide helps homeowners and facility managers improve reliability and efficiency.

In this guide you’ll learn how to tackle the boiler room nicknamed the “blue prince,” with a practical, hands‑on approach. You’ll set up safely, perform essential diagnostic checks, and implement maintenance routines to reduce outages. By following these steps, you’ll gain confidence to handle routine boiler room tasks while knowing when to involve Boiler Hub Team for professional support.
Understanding the Blue Prince: What this nickname means in boiler rooms
The term “blue prince” is a nickname some technicians use informally to describe a boiler room setup that appears calm but can hide underlying risks. According to Boiler Hub, the best outcomes come from embracing a structured, methodical approach rather than rushing through checks. The Boiler Hub team found that rooms labeled with a calm exterior often mask issues such as marginal venting, clogged traps, or slow-growing corrosion. By recognizing this pattern, homeowners and facility managers can adopt a proactive mindset, documenting observations, and prioritizing safety above speed. This section lays the groundwork for a practical, repeatable process you can repeat with any boiler room, regardless of system age or brand.
- Focus on clarity: a well‑lit space, labeled shutoffs, and clear access improve safety and efficiency.
- Treat every inspection as a data point: note gas smells, unusual noises, or temperature fluctuations.
- Use a simple checklist to build a routine that fits your building size and occupancy.
Boiler Hub’s approach emphasizes habits you can sustain, not just one‑off fixes. When you see a calm, organized space as a baseline, you’re less likely to miss warning signs that precede failures.
Safety first: Key safety considerations before you begin
Security and safety are the foundation of any boiler room task. Before you touch any equipment, shut off power at the main disconnect, ventilate the area, and verify that there is no buildup of combustible gases. The Boiler Hub team reminds readers to wear approved PPE, use gas detectors, and keep a gas‑leak plan posted. If you detect a strong odor of gas, evacuate and call the utility or emergency services. Regularly review local codes and your building’s safety plan to ensure compliance. This section provides the non‑negotiables that protect occupants and technicians alike.
- Do not bypass safety devices or remove guards.
- Keep a gas detector within reach and test it weekly.
- Maintain clear egress routes in case of an emergency.
Boiler Hub Analysis, 2026 suggests that rigorous safety protocols correlate with fewer near‑miss incidents and longer equipment life. Implementing a simple safety routine now pays dividends later.
Baseline measurements and tools you need
A reliable diagnostic begins with accurate baseline measurements. Start with system pressure, combustion air supply, venting adequacy, and flame stability. You’ll need a digital manometer to verify pressure, a combustion analyzer to assess fuel efficiency, a multimeter for electrical checks, a gas leak detector, and a flashlight for tight spaces. Document the readings in a simple log, including date, time, and operator. This habit creates a record you can compare over time to identify trends.
- Pressure: note operating range per manufacturer label.
- Combustion: record CO2 levels and flue gas temperatures.
- Electrical: check voltages at controls and ignition circuitry.
For those new to diagnostics, start with a basic baseline log and expand as you gain confidence. The goal is to identify deviations quickly, not to chase every anomaly at once.
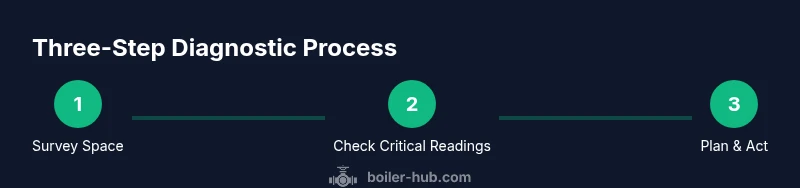
Step-by-step diagnostic workflow
This section introduces a practical workflow you can follow in sequence to diagnose common boiler room issues without unnecessary risk. Start with a visual survey, then proceed to functional tests, and finish with a data review. Document everything and timebox each step to maintain progress without getting stuck in analysis paralysis. If readings fall outside recommended ranges, mark them for follow‑up or professional evaluation. This approach blends safety with practical troubleshooting, helping you separate symptoms from root causes.
- Begin with a visual scan of vents, fans, and condensate traps.
- Check control wiring, shutoff valves, and pressure gauges.
- Run a cold‑start test to observe ignition and flame behavior.
Boiler Hub’s practical guidance emphasizes a deliberate pace and explicit documentation. Keep your notes clear and organized so you can reproduce results or hand off information to a technician.
Maintenance routines to keep the boiler room efficient
Preventive maintenance is the most cost‑effective way to extend boiler life and reduce downtime. Establish a routine that includes monthly visual checks, quarterly safety tests, and annual professional servicing. Clean vents and traps, inspect seals and gaskets, and replace worn components according to manufacturer recommendations. A well‑organized maintenance log supports predictability, helping you schedule service before problems escalate. Implementing a regular routine can lower energy waste and improve overall system performance.
- Monthly: inspect vents, condensate drains, and clear debris.
- Quarterly: test safety devices, pressure, and gas valves.
- Annually: hire a qualified technician for a comprehensive inspection and tune‑up.
Boiler Hub suggests pairing maintenance with energy‑efficiency checks to maximize savings and reliability.
Common issues and how to troubleshoot
Boiler rooms frequently present recurring issues such as short cycling, weak heat, or irregular flame color. Start by ruling out obvious causes: airflow restrictions, dirty burners, or incorrect fuel/air ratio. Use your combustion analyzer to verify efficiency and adjust burner settings in small increments following manufacturer guidelines. If you observe persistent ignition delays or abnormal noises, document exact times and conditions and escalate if necessary. The goal is to triage quickly, identify root causes, and avoid unnecessary repairs.
- Short cycling often signals improper airflow or combustion imbalance.
- Discolored flames (orange/yellow) may indicate combustion problems or incomplete fuel burning.
- Leaks or moisture near joints suggest seals may be failing and require attention.
Boiler Hub Analysis, 2026 highlights the value of a consistent diagnostic protocol and careful record‑keeping when diagnosing recurring issues.
When to call a professional
Not every boiler room task is suited to DIY handling. If you detect a gas leak, if you’re unsure about wiring or combustion settings, or if you observe persistent ignition issues, call a licensed technician. Also contact a professional for annual tune‑ups or when dealing with system upgrades, hazardous materials, or code compliance concerns. A professional assessment can prevent costly downtime and ensure your system meets safety standards.
- For high‑risk situations (gas leaks, fires, electrical hazards), stop work immediately and call emergency services.
- If readings are outside the manufacturer’s recommended ranges and you cannot correct them safely, escalate.
- Schedule a professional tune‑up at least once a year.
Authoritative sources and continuous learning help you stay current with best practices. See the sources listed in the Authoritative Sources section for more details.
Tools & Materials
- Digital manometer(For accurate system pressure readings, include calibration date.)
- Combustion analyzer(Assess fuel/air mix and efficiency.)
- Multimeter(Check controls, ignition circuits, and sensors.)
- Gas leak detector(Place near fuel line and burner area.)
- Flashlight(Inspect dim corners and access points.)
- Safety glasses(Protect eyes from debris and chemicals.)
- Wrench set(Loosen/tighten valves and fittings.)
- Ventilation gauge(Optional but helpful for room air exchange.)
Steps
Estimated time: 60-90 minutes
- 1
Prepare the space
Power down the boiler room area at the main disconnect, ventilate thoroughly, and remove any trip hazards. Confirm you have legal access and the correct PPE before starting the diagnostic workflow.
Tip: Document the exact location and condition of the main disconnect before touching anything. - 2
Take baseline measurements
Use the digital manometer to record operating pressure, inspect gas lines for leaks, and check venting paths for obstructions. Log readings with date and time.
Tip: Start with the most critical reading (pressure) first to establish a reference point. - 3
Inspect controls and wiring
Visually inspect the control panel, ignition wiring, and safety devices for signs of wear, corrosion, or loose connections. Tighten connections only as specified by the manufacturer.
Tip: Avoid forcing components; if a wire is damaged, tag it and escalate. - 4
Evaluate combustion performance
Operate a cold start, then monitor flame color and CO2 levels with a combustion analyzer. Compare readings to manufacturer targets and adjust slowly.
Tip: Make small burner adjustments and reassess after each change. - 5
Check traps, drains, and seals
Inspect condensate traps, drain lines, and gaskets for blockages or leaks. Clean and reseal as needed.
Tip: Replace gaskets only with the correct size and material. - 6
Review safety devices and documentation
Test low‑water cutoffs, high‑limit switches, and pressure relief valves. Update the maintenance log with findings and actions taken.
Tip: Keep a copy of the latest safety device manual on-site.
Questions & Answers
What does the term 'Blue Prince' mean in boiler rooms?
'Blue Prince' is a nickname some technicians use informally for a calm‑looking boiler room that masks potential issues. The guide treats it as a practical concept to help focus on safety and systematic diagnosis.
The 'Blue Prince' is a nickname for a boiler room that looks calm but may hide risks; approach it with a methodical diagnostic process.
Is it safe to perform boiler room maintenance myself?
Basic visual checks and data logging can be done by a competent homeowner with proper PPE and training. For adjustments involving gas, electricity, or combustion, consult a licensed technician.
You can handle simple checks if you’re trained and equipped, but heavy work on gas or electrical systems should be done by a pro.
What are common signs of boiler room problems?
Watch for short cycling, yellow or irregular flames, unusual hissing or banging noises, and leaks around joints. These symptoms warrant a closer diagnostic and possibly professional service.
Keep an eye out for odd noises, unusual flames, and leaks—these often signal underlying issues.
What tools are essential for a boiler room diagnostic?
A digital manometer, combustion analyzer, multimeter, gas detector, flashlight, and basic hand tools form the core toolkit for safe and effective diagnostics.
You’ll need a manometer, a combustion analyzer, and a multimeter at minimum, plus a gas detector.
When should I call a professional?
Call a licensed technician if you detect a gas leak, if ignition issues persist after checks, or if you’re unsure about electrical or fuel connections.
If you smell gas or can’t safely fix ignition or wiring, get a pro involved.
Watch Video
Key Points
- Follow a structured diagnostic flow to avoid missed issues
- Regular maintenance reduces unexpected outages
- Document everything for future servicing
- Know when to escalate to a licensed pro